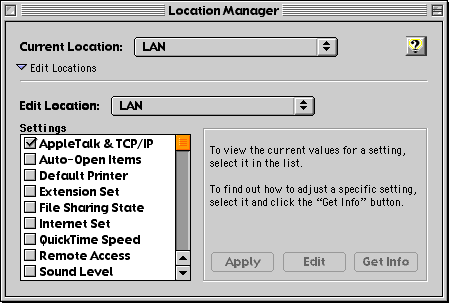
The Keeper of the iBookLocation, Location, Location, Part 2By Mark Newhouse, <ibook_keeper@mac.com> Last time we walked through how to set up all of the control panels that would be necessary to create several Loctions for use with the Location Manager. The Location Manager is a powerful tool that Apple has built into the operating system. It allows you to quickly change a number of control panels all at once, and is especially useful for changing the network configurations on iBooks and PowerBooks if you take it back and forth between work and home. Setting Up the Location ManagerIf we did not have the Location Manager we would have to manually switch each configuration when arriving at the office after having connected via PPP at home the night before. With the Location Manager it is as simple as choosing a previously saved Location from the control strip. So let's create some Locations. The Location Manager
Open the Location Manager control panel. If you don't see the full window as shown above, click the triangle next to Edit Locations at the bottom left corner of the window, You'll see a list of options that you can add to your Locations. We are going to set up three Locations. We'll start with the home dial-up connection. Choose New Location... from the File menu and name your location. Let's call it Home. We'll assume that you are also connecting to a small AppleTalk network at home via ethernet. We need to tell the Location Manager that we want it to use PPP for TCP/IP, ethernet for AppleTalk networking, and Remote Access to dial the modem and connect to your ISP. Start by checking AppleTalk & TCP/IP under Settings. The Location Manager will tell you what the active configurations are for both AppleTalk and TCP/IP. We want them to be Ethernet for AppleTalk and PPP for TCP/IP. If these are the active configurations then click Apply, otherwise click Edit. A dialog box will open prompting you to open one or both of the control panels. Open the control panels that need changing, and then choose Configurations... from the File menu. Select and apply the correct configuration, then close the control panel. Finally, click Apply in the edit dialog to return to the Location Manager control panel. Next click Remote Access to modify its settings. Open the appropriate control panels to select a configuration. If there is only one configuration the buttons to open the control panel will be dimmed and disabled. Once you have made your choices, click Apply and you are done. Click Apply in the Location Manager, and you have created your first Location. To create the other locations do the same steps, but select the appropriate configurations. I have three Locations set up on my iBook. Home is set up to use Remote Access for dial-up Internet connection, and TCP/IP set to connect via PPP. AppleTalk is set to use the built-in Ethernet port (via a crossover cable to my G3 or recently acquired grape iMac). LAN is set up to use ethernet for TCP/IP and AppleTalk, and AirPort is set to connect to the AppleTalk network and internet via an AirPort base station. The Location Manager Control Strip Module
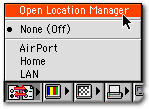
Once you have created your Locations, switching between them is a simple task. Simply expand the control strip, and click the Location Manager CSM. You'll get a pop-up menu with a list of Locations. Select the location you want and click. Your iBook will take a few seconds to switch the configurations and then inform you that everything is ready to go with the new configurations. It is also possible to switch "silently" by holding down the Control key as you switch Locations with the Location Manager CSM. Next time I'll discuss some of the other features of the Location Manager, including how to add a printer configuration, change the extension set, or even change the sound level for a given location. Mark Newhouse is the Web Designer for the public outreach arm of the National Optical Astronomy Observatories in Tucson, AZ. He has been using Macs for over a decade, and is continually amazed at how much functionality is built into the Mac OS. The iBook image is courtesy Apple Computer, Inc. The iBook icon is courtesy the Iconfactory. |
|
Keeper of the iBook Copyright © 2000, Mark Newhouse, all rights reserved

